Weekend Photo Roundup

This past weekend we celebrated the 4th of July. My sister and her family arrived on the 4th and my parents joined us on the 5th. We had a full weekend of food, fireworks, hanging out on the deck, more food, laughter and shopping. It sure was fun! I think we’re all still trying to get back to reality.

20140708-092022-33622058.jpg

20140708-092022-33622516.jpg

20140708-092023-33623248.jpg

20140708-092021-33621748.jpg

20140708-092023-33623867.jpg

20140708-092020-33620898.jpg

20140708-092025-33625476.jpg

20140708-092024-33624431.jpg

Have a great day!

Leave a comment »

4th of July DIY Pennant Garland

20140703-115130-42690241.jpg

I decided we could use a little decor up for the 4th of July weekend Holiday. Not wanting to go out searching for what I had in mind, I decided to go ahead and make it. All of the materials were ones that I had on hand and it only took a couple hours. It may have taken me that long because I had a 2 yr old helper.

Materials used;
2 pieces of blue construction paper
2 pieces of red construction paper
3 pieces of white copy paper
bakers twine
Scissors
A paper slicer
Hole punch

20140703-115259-42779647.jpg

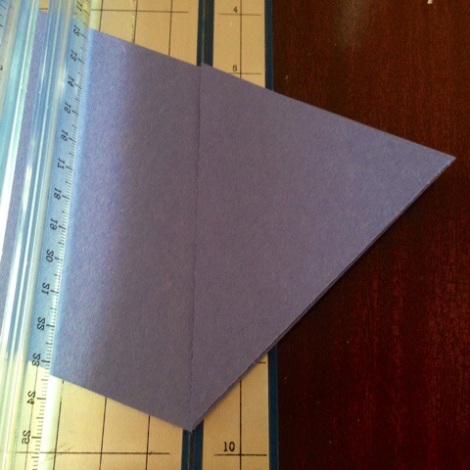
1. Slice all pieces of paper in half lengthwise. My white paper was narrower than the construction paper, which will help make my white triangles slightly smaller. If your paper is all the same size, slice just a bit off of the color you would like smaller.
2. Angle long strips into slicer to make triangles. Once I got one I used it to lay over the next slice to help get them the same size.
3. Cut triangles from all colors of paper.

20140703-115628-42988872.jpg
3. Cut triangles from all colors of paper.
4. Use a hole punch to makes holes in both corners of the shorter side of your triangles. This is to thread your twine through.

20140703-115806-43086780.jpg
5. Measure out your desired length of twine and cut.
6. String on your triangles by stacking 2 and going down through one hole and up through the other. Continue until all of your triangles are strung up.
7. Hang your pennant garland and enjoy!

20140703-115921-43161172.jpg

If you have kids old enough to help out; this would be a great summer day “I’m so bored!” activity for them.

Have a great weekend!

20140703-120336-43416568.jpg

Leave a comment »

Grilled Stuffed Squash Blossom Recipe

20140630-132614-48374523.jpg

I hope you’re all having a great Monday and enjoying your summer! It’s hard to believe that it’s already July.
We’ve been busy around here…keeping up with our garden, chasing Squishy and going for bike rides on the Fox River Trail.
This weekend we had zucchini and summer squash blossoms popping up all over the garden. The female blossoms have a small bulb at their base that a squash with grow from. The male blossoms are often on longer stems and once they close up they’re perfect for stuffing! Pictured below are a couple make blossoms that were growing in a planter on our deck.

20140630-125008-46208043.jpg
We had some family in town so we had a perfect excuse to fire up the grill and try something new. The 8-10 squash blossoms sounded like fun to play with!
Grilled Stuff Squash Blossoms
4 oz ricotta cheese
2 oz grated fresh Parmesan
A pinch of cumin
1 Tbs minced cilantro
About a tsp of minced jalapeño (leave out the seeds if you’re sensitive to spice)
Salt and pepper to taste
Mix above together and place into a zip top baggie, trim one comer and use to pipe into each blossom.

20140630-132227-48147818.jpg

We put them on a hot grill and turned over after 4 minutes. After 8 minutes they had some nice grill marks and were warmed through.

20140630-132406-48246642.jpg
These were fun to make and a healthier alternative to frying. We enjoyed them along side grilled veggie tacos and corn on the cob.

Comments (4) »

Snowday cookies!

20140122-134546.jpg
What else would we be doing on a snow day? Baking, of course!
I used 1/4 c raw sugar and 1/4c white sugar with the 1/2 c brown sugar this time, mainly because I was getting low on raw sugar. I like the crunch that raw or turbinado sugar gives to cookies, but you could certainly use what you have or prefer. These would also be really fantastic with a 1/2 c chopped pecans and a 1/2 c dried cranberries…I just didn’t gave any today.
Snow day cookies or Peanut butter oatmeal chocolate chip cookies

3/4 c softened butter
1/2 c peanutbutter
1/2 c sugar
1/2 c brown sugar
1 egg
1 tsp vanilla
1 tsp baking soda
3/4 tsp salt
1 1/4 cup whole wheat flour
1 1/2 c old fashioned oats
1/4 c flax meal
3/4 c semi sweet chocolate chips

Cream together butter, peanut butter, sugars, egg and vanilla until fluffy. Add in all dry ingredients and stir until well combined. Scoop onto a un greased cookie sheet in heaping teaspoons.

20140122-140519.jpg
Bake at 375 for 7-9 minutes or until golden on the edges.

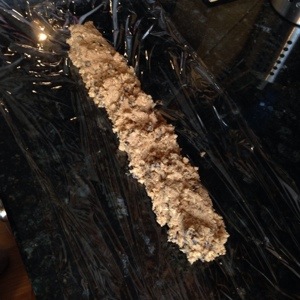
If you’re worried about making to many cookies to eat before they go stale, portion out 1/2 the dough into a log onto plastic wrap. Roll it up and seal it in another layer of plastic wrap and pop it into the freezer.

20140122-140804.jpg
Now you have a roll of slice and bake cookies for any day! Enjoy your cookies and stay warm!

20140122-140947.jpg

Leave a comment »

Happy 2014 and yes, another muffin recipe

br />
20140108-152106.jpg
Happy 2014! 2013 was crazy busy and exciting! Squishy turned 2, we bought our 1st home, moved out of the city, had our 1st Christmas in our own home! It was a great year, but we’re ready for a new year!
I hope you all had a nice holiday season! Squishy is now 2 years old and old enough to get excited about Santa, decorating, cookies, wrapping and unwrapping gifts, more cookies. Seriously, the kid is a cookie addict.
Bringing in the new year with the polar vortex was fun! No, not really. -44 wind chills are just ridiculous and luckily we made it through without any incidents. *knock on wood* The most amazing part to me, at the moment, is that we have been inside since Saturday (yes we’re into 60 hours indoors) and we haven’t lost it. It’s been touch and go a few times.
br />
20140108-152352.jpg
Today we received a lovely gift basket from one of the Mr’s clients. Harry & David *cue the choir* Squishy loves pears so much, 6 gorgeous pears on top of all the chocolates are a major bonus! We decided since we had so many that we should make muffins. Would you really expect me to make anything else? Pear almond muffins are my favorite, so I kinda had to! I made them sorta healthy… And they are delicious, if I do say so myself. I really hope you read that in Ed Grimley’s voice…if not, shame on you! If you have no idea who Ed Grimley is I suggest you go look him up after you read this post.
So here’s the recipe.

20140108-152822.jpg

Close Enough to Healthy Pear Almond Muffins

1 cup all purpose flour
1/2 cup wheat flour
1 Tbs flax meal *
1/2 cup turbinado sugar
1/4 cup brown sugar
1/2 tsp baking soda
1 1/2 tsp baking powder
1/2 tsp salt
1/2 tsp almond extract
1/2 tsp vanilla
1 egg
1/3 cup apple sauce
1 heaping Tbs almond butter
1/3 cup + 1 tbs milk
2 cups shredded pear
1/2 cup sliced almonds

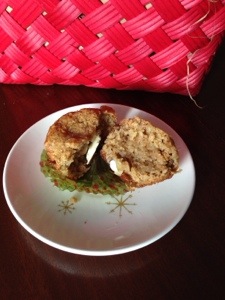
Preheat oven to 400 and grease a muffin tin or line with paper liners. Combine dry ingredients in a large bowl. Gently stir in moist ingredients including your shredded pear. Fill your muffin cups 3/4′s full. Bake for 18-22 minutes or until nicely brown and a toothpick come out with just a tad bit of crumb.
I added the almond butter because I had it in hand and thought it couldn’t hurt, plus it adds a little protein. If you don’t have any, just leave it out.
Enjoy!

20140108-153042.jpg

Leave a comment »

Caramel Apple Muffins

Fall is in the air which means that my need to bake has kicked in. Last weekend we went apple picking and “accidentally” picked 13 pounds of apples! I’ve been trying to make good use of them this week. If you’ve read my blog before, you know that fall and my need to bake means muffin time! I make a batch of cinnamon apple muffins last week and while they were yummy I couldn’t help wondering if the could be improved with some caramel. I mean, come on, how can you not combine caramel and apples? It’s only natural!

20130926-105124.jpg

Caramel apple muffins

1 cup all purpose flour
1/2 cup wheat flour
1 Tbs flax meal
1/2 cup sugar
1/4 cup turbinado sugar
2 tsp baking powder
1/2 tsp salt
1 tsp vanilla
1 egg
1/3 cup oil or applesauce *(see note)
1/3 cup + 1 tbs milk
4 apples shredded with skins on
1 & 1/4 cups caramel bits

Preheat oven to 400 and grease a muffin tin or line with paper liners. Combine dry ingredients in a large bowl. Gently stir in moist ingredients including your shredded apple. Fold in caramel bits.
Fill your muffin cups 2/3′s full and bake for 18-22 minutes or until nicely brown and a toothpick come out with just a tad bit of crumb.

*(note) I doubled the recipe, since my parents are dropping by today. I used 1/3 c oil and 1/3 c applesauce when doubling the recipe.

20130926-105554.jpg

Leave a comment »

Mmm…Bread

20130207-105912.jpg
A couple months ago I started making our bread. I’m just tired of paying $4.00 for mooshy bread. Unless I’m at Trader Joe’s, then I take a few days off from baking and buy a loaf. Anyways…I started playing around with recipes around Christmas time. I usually make 2 loaves at a time, 1 for sandwiches and 1 cinnamon raisin.

Bread recipe
2 (.25 ounce) packages active dry yeast
3 tablespoons sugar
2 1/2 cups warm water (110 degrees F/45 degrees C)
3 tablespoons lard, softened
1 tablespoon salt
1/2 cup oats
2 tablespoons flax meal
1 1/2 cup whole wheat flour
4 cups unbleached white flour

Directions
In a large bowl, dissolve yeast and sugar in warm water. Stir in lard, salt, oats, flax meal and two cups of the flour, starting with the wheat flour. Stir in the remaining flour, 1/2 cup at a time, stirring well after each addition. When the dough has pulled together, turn it out onto a lightly floured surface and knead until smooth and elastic, about 8 minutes.
Lightly oil a large bowl, place the dough in the bowl and turn to coat with oil. Cover with plastic wrap and a clean dishcloth and let rise in a warm place until doubled in volume, about 1 hour.
Deflate the dough and turn it out onto a lightly floured surface. Divide the dough into two equal pieces and form into loaves. Place the loaves into two lightly greased 9×5 inch loaf pans. Cover the loaves with plastic wrap and a dishcloth and let rise until doubled in volume, about 40 minutes.
Preheat oven to 425 degrees F (220 degrees C).
Bake at 375 degrees F (190 degrees C) for about 30 minutes or until the top is golden brown and the bottom of the loaf sounds hollow when tapped.

Yes, I do use lard… Mom brought some to us, so I use it in the bread. But you could use any shortening or butter of choice.
We also make one loaf into cinnamon raisin bread. After dividing dough into 2 parts and before forming loaves, roll dough for 1 loaf out. Roll it so it is about 9 inches wide and 1/2 inch thick…it will be about 20 inches long or so.

20130207-110731.jpg
Sprinkle 1/4 cup sugar and 1-2 Tbs of cinnamon ( depending on how much cinnamon you like), then sprinkle with about a 1/3 cup of raisins. With having a toddler in the house we always have those little boxes of raisins in the pantry. This is a great way to use up the box that got partially eaten, then dried out. The raisins will plump up great while baking.

20130207-110858.jpg
Roll up and shape into loaf. Put loaf into greased pan and allow to rise for about 40 minutes. Bake as directed above.

20130207-111047.jpg
Is there much better than a bowl of potato soup and a slice of fresh bread on a cold winter evening?
Enjoy!

Comments (1) »

Whole Grain Pumpkin Pancakes

20121013-120649.jpg
A truly yummy fall breakfast with a little less guilt. We went to a pumpkin farm a few weeks ago. If you live in the Chicago area, go to Kroll’s in Waukegan, IL. It’s a nice family run farm with a $7.00 corn maze, a short $3.00 educational hayrack ride and plenty of very reasonably priced pumpkins and gourds. No exotic animals, no admission fee and plenty of spots to take photos of the family!

20121013-121552.jpg
I roasted my pumpkins. You can used canned, but I like roasting my own. Preheat your oven to 350 degrees. Cut your pumpkin in half, scoop out the seeds and place the cut pumpkin cut side down into a baking dish. Add about a 1/4 inch of water to the pan and roast for 40-60 minutes or into the pumpkin gives when you poke it.

20121013-121907.jpg
I like to scoop my pumpkin out with an ice cream scoop. It’s much quicker and easier than a spoon.
When the pumpkin has cooled a bit, scoop out the flesh and mash or purée.
Now for the pancakes!!!

~Pumpkin pancakes~
1/2 cup white flour
1/2 cup whole wheat flour
1/4 cup oats
1 tablespoon flax meal
1 tablespoon wheat germ
1/2 teaspoon baking soda
1 teaspoon baking powder
1/2 teaspoon salt
1/4 teaspoon cinnamon
2 tablespoons sugar
One egg
2 tablespoons oil
1 cup milk
One cup puréed pumpkin

Mix together dry ingredient in a bowl. Stir together wet ingredients in a small bowl, I actually do this in my 2 Cup measuring cup…why dirty another bowl. Gently stir the wet ingredients into the dry. Pour about a 1/4 cup at a time onto a preheated skillet over medium low heat. Cook for about 3 minutes per side. You can tell that the 1st side is done when bubbles for and pop in the center of the pancake.

This recipe makes about a dozen 5 inch pancakes.

20121013-122703.jpg
Top with butter and maple syrup. Enjoy!
For Squishy I leave the syrup off and cut the with a pizza cutter into bite size pieces. Pancakes are one thing I know he’ll eat, even when he’s cutting 1st year molars. It’s nice to be able to sneak in the whole grains and milk.

Have a great weekend! I hope you get a chance to get out and enjoy a bit of the fall colors.

20121013-123606.jpg

Leave a comment »

Fruit & Whole Grain Bar Recipe

I should probably rename my blog to How to Feed Squishy. Lately all of my posts seem to be new recipes, but when you have a toddler who is into food, well… So, anyways. We had some of those store bought Nutrigrain bars that someone brought us. I was grabbing one for myself to snarf first thing in the morning because when I wake up I’m starving!
Advantage of breastfeeding? I can eat like a teenage boy and not worry about my weight. Disadvantage of breastfeeding? I want to constantly eat like a teenage boy.
So, back to the bars. Just recently Squishy has decided that he should get to eat my bar with me when we get up in the morning. I had never thought too much about what was in them until he wanted a bite.
High fructose corn syrup? Mono-what? Poly saturated-huh? Somethingluten-whatta? No, not ok.
So the other day during nap time I went into the kitchen to figure something out that he would like & I would not wince if he ate it. I used a can of Oregon blueberries for the fruit because 1. I had them on hand and 2. The ingredients in them are blueberries, sugar and water. That’s it! You can use any fruit flavor you like or even preserves of your choice. You just won’t have to reduce your preserves to thicken them. If you have fresh fruit you could cook them with a little sugar and water and follow my canned directions.

20120926-134214.jpg

Fruit & Whole Grain Bars

1 can Oregon blueberries
1/2 cup softened butter
1/2 cup brown sugar
1 egg
1 tsp vanilla
1 cup oats
1/2 cup wheat flour
2 tbs flax meal
6 tbs wheat germ
1/2 tsp salt
1/2 tsp baking powder

Preheat oven to 350 and grease an 8x8x2 inch pan with no stick spray.
Pour can of blueberries into a medium sauce pan and simmer, stirring every couple minutes, for about 10 minutes or reduced by half. Set aside to cool. The syrup will be thicker once cooled.
Meanwhile mix the softened butter, sugar, vanilla, egg and salt in a medium sized mixing bowl until soft and creamy consistency. Add in remaining dry ingredients and stir. Once combined your mixture with resemble a cookie batter.

20120926-134431.jpg
Press half of the batter into the bottom of your 8×8 pan. Pour the cooled blueberries over and spread evenly with a spatula. Next take the remaining batter and flatten small amounts with your hands and place on top until it is covered. This won’t look pretty and may even look like a mistake, but it works. 😉
Place dish in the center of your oven and bake 20-25 minutes until the berries are bubbly at the edges and the topping is golden brown around the edges too.

20120926-134527.jpg
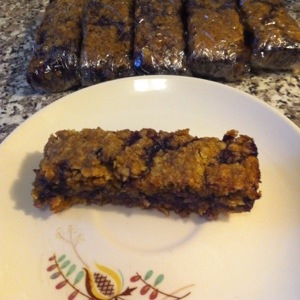
Allow to cool completely and cut into bars. I cut ours into about 1.5×4 inch bars. I wrapped 6 of them individually to freeze. Four of the bars were stored in an airtight container. Two bars were eaten as soon as they were cool enough to taste.
These passed the Squishy test right away! I should have waited until he was finished with lunch before letting him try a nibble. Oh well, at least I know exactly what is in them. No words we can’t pronounce and no high fructose corn syrup!

20120926-134631.jpg

Comments (2) »

Nectarine Muffins

20120918-082349.jpg

A lot has been going on around here for the past weeks. Squishy turned 1 year old, but that’s another story, and he has begun walking!!! Its like watching a tiny drunken old man stumble around the house! The cutest, most hilarious and oh so frightening thing all at once!
Fall is coming quickly and it has me itching to bake. The heat kicked on last night! Yay, fall! Yes, I’ll be complaining that I’m freezing in just a couple of weeks, but oh, I love fall!
Squishy loves food, especially muffins when it comes to breakfast foods. Last weekend we had some beautiful nectarines from the farmer’s market and a craving for muffins. So we got into the kitchen and whipped these up!

Nectarine Muffins
1 cup all purpose flour
1/2 cup wheat flour
1 Tbs flax meal *
3/4 cup turbinado sugar
2 tsp baking powder
1/2 tsp salt
1/2 tsp cinnamon
1 tsp vanilla
1 egg
1/3 cup oil
1/3 cup + 1 tbs milk
2 nectarines finely diced
1/2 cup granola
2 Tbs brown sugar

Preheat oven to 400 and grease a muffin tin or line with paper liners. Combine dry ingredients in a large bowl. Gently stir in moist ingredients including your diced nectarine. Stir in about 1/2 of your granola. (our granola has slivered almonds in it, so i stir it in after filling 1/2 of the muffin liners. No nuts for squishy yet, choking hazard.) Fill your muffin cups 2/3’s full. Sprinkle tops with what’s left of the granola mixed with the brown sugar. Bake for 18-22 minutes or until nicely brown and a toothpick come out with just a tad bit of crumb.
Squishy devoured these, so I hope you love them too! If you try them please let me know what you think!

*I know the pre packaged flax meal can be expensive. I buy flax seeds in bulk at the natural food store, whole foods may have them too. Our Baby Bullet that we received for a shower gift has a milling blade so we grind them with that and store them in a jar in the refrigerator. If you don’t want to bother with it at all, just leave it out. A small handful of oats might be good in its place.

Leave a comment »